
Changing the domain name on a WordPress website can be a daunting task, especially if you’re not familiar with the process. However, with the right preparation and a step-by-step approach, it is possible to change the domain name on a WordPress website without too much trouble.
Change your WordPress domain name by backing up your website, updating your DNS settings, using a search and replace plugin, and redirecting old URLs. Monitor your website after the change for any issues.
Whether you’re rebranding your website, choosing a more SEO-friendly domain name, or simply want to choose a domain name that is easier for visitors to remember, this guide will provide you with everything you need to know to change the domain name on your WordPress website.
From backing up your website to updating your DNS settings, we’ll cover all the steps you need to take to ensure a smooth transition to your new domain name.
So, are you ready to give your website a new identity? Let’s get started!
Understand: What Is a Domain Name and How It Works

A domain name is a unique string of characters that identifies a website on the internet. It serves as the address that people type into their browser to access a website.
The domain name is translated into an IP address by the Domain Name System (DNS) servers, which then directs the browser to the server where the website is hosted.
A domain name usually consists of two parts: The Name and The Top-Level domain (TLD), such as .com, .net, or .org.
Examples of domain names are google.com, amazon.com, and wordpress.org. It’s important to note that a domain name is different from a website’s URL, which is the specific page address that you see in your browser’s address bar.
Why and When To Change Your WordPress Domain Name
There are several reasons why someone may want to change the domain name of their WordPress website, including:
- Rebranding: The website owner may want to change the name of their business or organization, and therefore wants to update their website’s domain name to match.
- Improved SEO: The website owner may want to choose a more SEO-friendly domain name, which will make it easier for their website to rank well in search engines.
- Easier to remember: The website owner may want to choose a domain name that is easier for visitors to remember, making it more likely that they will return to the website in the future.
- Better targeting: The website owner may want to target a specific audience or geographic location and choose a domain name that is more relevant to their target market.
- Avoiding confusion: The website owner may have multiple websites with similar or identical names and wants to avoid confusion by choosing a unique domain name for each website.
- Legal Issues: The website owner may be using a domain name that is similar to a trademarked name and wants to avoid any legal issues by changing the domain name.
- Security: The website owner may want to change the domain name to improve the website’s security by making it harder for hackers to guess the website’s URL.
Step.1- Creating a Backup of Your WordPress Website Before Changing the Domain Name
Backing up your website before making any changes, such as changing the domain name, is an important step in the process. It ensures that you have a copy of your website’s content, settings, and files in case something goes wrong during the process.
There are several ways to backup your WordPress website, some of the most popular methods include:
- Plugin-based backups: There are many plugins available that can be used to back up your WordPress website. Some popular options include UpdraftPlus, BackupBuddy, and VaultPress. These plugins allow you to create a full backup of your website, including the database, theme, and plugin files.
- Manual backups: You can also create a manual backup of your website by using an FTP client to download all of the files from your website’s server, and using phpMyAdmin to export a copy of your website’s database.
- Hosting provider backups: Some web hosting providers also offer a built-in backup feature. This allows you to create a backup of your website directly from your hosting account.
- Cloud Backup: You can also use cloud-based services like Google Drive, Amazon S3, or Dropbox to store the backup files of your website. This will allow you to access the backups from anywhere, and it will also provide an added layer of security.
It’s important to note that whichever method you choose, it’s essential to store the backup files in a safe place, and regularly check the backup files to make sure they are working.
Once you have a backup of your website, you can proceed with the domain name change process with confidence knowing that you can restore your website to its previous state if something goes wrong.
Step.2 – How Should You Register a New Domain Name
Registering a new domain name is an important step in the process of changing the domain name of a WordPress website. There are some tips and tricks to keep in mind when registering a new domain name that can help to ensure a smooth transition to the new domain name.
- Choose a relevant and memorable name: When choosing a new domain name, it’s important to select a name that is relevant to your business or organization and is easy for visitors to remember. This can help to improve the website’s visibility and attract more visitors.
- Opt for a .com TLD: While there are many TLDs to choose from, such as .net, .org, .info, .biz, etc., the .com TLD is still the most recognized and trusted by visitors and search engines.
- Check availability: Before registering a new domain name, make sure to check the availability of the domain name. You can do this by using a domain name registrar’s search tool.
- Check for trademarks: It’s important to make sure that the new domain name is not similar or identical to any registered trademark.
- Protect your privacy: When registering a new domain name, you will be required to provide contact information such as your name, address, and phone number. Some registrars offer privacy protection services that can mask your personal information from public records.
- Register for multiple years: Registering a domain name for multiple years can help to ensure that the domain name remains registered in your name and prevent it from expiring.
- Keep the old domain name: Keep the old domain name registered for at least a few months after the change, so that any links or bookmarks to the old domain name will still work
Step.3 – DNS Settings: The First Step After Purchasing a New Domain Name
Updating your DNS settings is an important step in the process of changing the domain name of a WordPress website. It ensures that visitors are directed to your new domain name when they visit your website.
Here is a step-by-step guide on how to update your DNS settings:
- Log in to your domain name registrar’s account: Go to the website of the company where you registered your domain name and log in to your account.
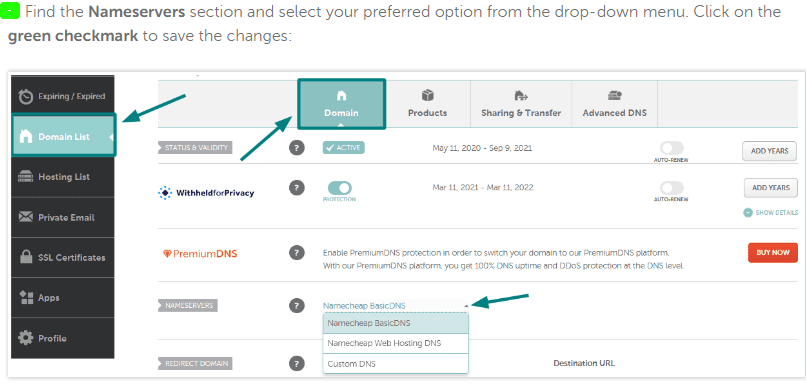
- Locate the DNS management area: Once logged in, navigate to the area where you manage your DNS settings. This may be called “DNS Management,” “Name Server Management,” or something similar.
- Update the Name Servers: Change the current name servers to the new ones provided by your web hosting provider.
- Save the changes: Make sure to save the changes you have made to your DNS settings.
- Update your domain’s A record: An A record, also known as an address record, is used to map a domain name to an IP address. Ensure that your new domain name’s A record is updated to point to the IP address of your hosting server.
- Update your domain’s CNAME record: A CNAME record is used to map a domain name to another domain name. Ensure that your new domain name’s CNAME record is updated to point to the domain name of your hosting server.
- Wait for the DNS to propagate: The changes you made to your DNS settings may take some time to propagate across the internet. This process can take anywhere from a few minutes to a few days depending on the provider.
- Test the new domain name: After the DNS propagation is done, test the new domain name to ensure that it’s working correctly and visitors are directed to the new domain name.
Please note that the above instructions may vary depending on your domain name registrar or hosting provider. It’s important to consult their documentation or contact their support team for specific instructions on updating your DNS settings.
Also, it’s worth noting that some hosting providers allow you to manage your DNS settings within their control panel, which can simplify the process. Additionally, some registrars or hosting providers may offer a DNS management service that allows you to manage all of your domains in one place.
It’s also important to note that DNS changes can take time to propagate across the internet, so it’s essential to be patient and wait for the changes to take effect.
It’s recommended to keep the old domain name registered for a few months after the change so that any links or bookmarks to the old domain name will still work.
In case of any issues, troubleshooting common DNS problems such as website downtime lost traffic, and other issues, you may want to check your DNS settings, check the DNS propagation, check the A and CNAME records and check the name servers.
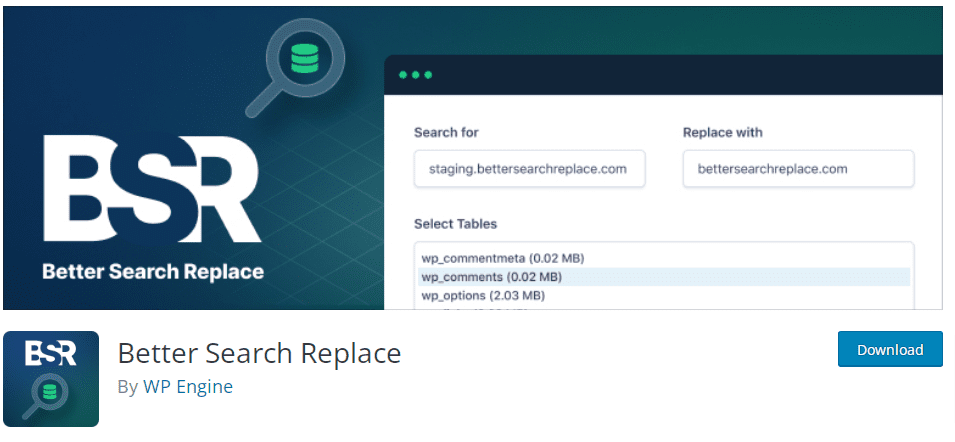
Step.4 – Installing and Using the “Better Search Replace” Plugin
The “Better Search Replace” plugin is a useful tool that can be used to update all instances of your old domain name in your website’s database with your new domain name. This is an important step in the process of changing the domain name of a WordPress website, as it ensures that all internal links, images, and other elements are updated to reflect the new domain name.
Use the “Better Search Replace” plugin:
Log in to your WordPress dashboard and navigate to the “Plugins” section. Search for “Better Search Replace” and install it.
Once the plugin is installed, activate it, navigate to “Tools” and then “Better Search Replace.” In the “Search for” field, enter your old domain name.
In the “Replace with” field, enter your new domain name, and select the tables that you want to update.
Click on the “Run Search/Replace” button to start the replacement process.
Here is a step-by-step guide on how to install and use the “Better Search Replace” plugin:
- Install the plugin: Log in to your WordPress dashboard and navigate to the “Plugins” section. Search for “Better Search Replace” and click “Install Now.” Once the plugin is installed, click “Activate.”
- Run the search and replace: Once the plugin is activated, navigate to “Tools” and then “Better Search Replace.” In the “Search for” field, enter your old domain name. In the “Replace with” field, enter your new domain name. Make sure that you double-check the domain names before running the plugin.
- Select the tables to update: Select the tables that you want to update. This can include the posts, pages, links, and custom post types tables.
- Run the replacement: Click on the “Run Search/Replace” button to start the replacement process.
- Final check: Once the replacement process is complete, visit your website to ensure that all internal links, images, and other elements are updated to reflect the new domain name.
It’s important to note that using a plugin like “Better Search Replace” can be powerful but also dangerous if not used correctly. It’s crucial to double-check the domain names before running the plugin to ensure that the correct domain name is being replaced. Also, it’s recommended to test the plugin on a development or staging site before running it on a live site.
Additionally, it’s important to note that this plugin only updates the instances of the old domain name within the database, it’s still necessary to update the DNS settings to point to the new domain name and also set up redirects from the old domain name to the new domain name.
It’s also worth mentioning that there are other similar plugins like “Velvet Blues Update URLs” that you can use to do the same job.
In summary, Installing and using the “Better Search Replace” plugin is a great way to replace all instances of your old domain name with your new domain name, but it’s important to do so with caution and to test the process on a development or staging site before running it on a live site.
Step.5 – Updating Your WordPress Settings for the New Domain Name
Update your WordPress settings: After the replacement process is complete, go to the WordPress settings and update the site URL and home URL to reflect the new domain name.
Updating your WordPress settings to reflect your new domain name is an important step in the process of changing the domain name of a WordPress website. This process involves updating the site URL and home URL settings to reflect the new domain name, ensuring that all internal links, images, and other elements are updated to reflect the new domain name.
Here is a step-by-step guide on how to update your WordPress settings for the new domain name:
- Log in to your WordPress dashboard: Go to the website’s admin page by adding “/wp-admin” to the end of your domain name.
- Navigate to the “Settings” section: Once logged in, click on the “Settings” option in the menu on the left-hand side of the screen.
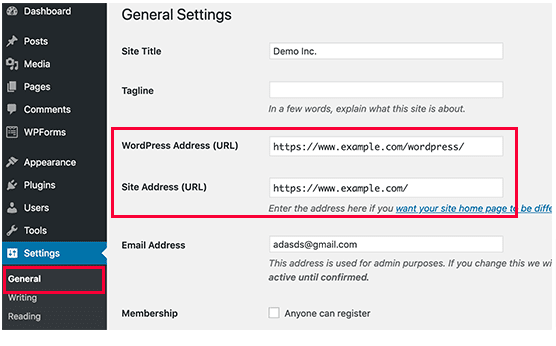
- Update the site URL and home URL: In the “General” settings, update the “WordPress Address (URL)” and “Site Address (URL)” fields to reflect the new domain name.
- Save the changes: Make sure to save the changes you have made to your settings by clicking the “Save Changes” button.
- Check that the new domain name is showing up correctly: Visit your website to ensure that the new domain name is showing up correctly in your website’s URL.
It’s important to note that it may take some time for the changes to take effect, so be patient and wait for the changes to propagate. Also, make sure to double-check the new domain name before saving the changes to ensure that you have entered it correctly.
Additionally, ensure that you have set up 301 redirects from the old domain name to the new domain name to avoid any broken links or 404 error pages.
In summary, updating your WordPress settings for the new domain name is an important step in the process of changing the domain name of a WordPress website.
By following the above guidelines and tips, you can ensure that all internal links, images, and other elements are updated to reflect the new domain name and your website continues to function smoothly.
Step.6 – Setting Up 301 Redirects: From the Old Domain Name to the New Domain Name
Setting up 301 redirects is an important step in the process of changing the domain name of a WordPress website. 301 redirects ensure that visitors are directed to the correct pages on your new domain name, even if they visit your old domain name. This is especially important for maintaining your website’s search engine rankings and for preventing broken links or 404 error pages.
Here is a step-by-step guide on how to set up 301 redirects from the old domain name to the new domain name:
- Choose a redirect method: There are several ways to set up 301 redirects, including using a plugin, modifying the .htaccess file, or using your web hosting provider’s control panel. Choose the method that works best for you.
- Use a plugin: If you choose to use a plugin, there are several plugins available such as “Simple 301 Redirects” and “Redirection” that can easily set up 301 redirects for you.
- Modifying the .htaccess file: If you choose to modify the .htaccess file, you’ll need to access it via FTP or through your web hosting provider’s control panel. Once you have access, add the necessary code to redirect the old domain name to the new domain name.
- Use your web hosting provider’s control panel: Some web hosting providers offer an option to set up redirects in the control panel. Consult your web hosting provider’s documentation or contact their support team for specific instructions.
- Test your redirects: Once the redirects are set up, test them by visiting the old domain name and ensuring that you are redirected to the new domain name.
Make sure to double-check the new domain name before setting up the redirects to ensure that you have entered it correctly.
It’s important to test the redirects to ensure they are working properly and to keep track of the redirects in case you need to make any updates in the future. It’s also good to set up redirects for at least a year or two after the domain change, to ensure that visitors who may have bookmarked or have old links to the old domain name, can still reach the new one.
Step.7 – Testing and Monitoring Your Website After the Change
Testing and monitoring your website after making the domain name change is an important step in the process of ensuring that everything is working properly. Even if you have taken all the necessary precautions and have followed all the steps correctly, there may still be issues that arise after the change.
Here is a guide on how to test and monitor your website after making the domain name change:
- Test your website: After the domain name change, visit your website to ensure that all internal links, images, and other elements are working correctly. Check for broken links, missing images, or other issues that may have been caused by the domain name change.
- Test your redirects: Test your redirects to ensure that they are working properly. Visit your old domain name and ensure that you are redirected to the new domain name.
- Monitor your website: Monitor your website for a few days after the change to ensure that everything is working properly. Check for any 404 error pages or broken links that may have been missed during the testing process.
- Monitor your analytics: Keep an eye on your website’s analytics to ensure that there is no significant drop in traffic or any other issues that may have been caused by the domain name change.
- Monitor your search engine rankings: Keep an eye on your website’s search engine rankings to ensure that there is no significant drop in rankings or any other issues that may have been caused by the domain name change.
Keep track of any issues that arise after the change so that they can be addressed promptly.
Troubleshooting Common Issues After Changing the Domain Name
Changing the domain name of a WordPress website can sometimes lead to problems, such as broken links or missing images. Here is a guide on how to troubleshoot common issues that may arise after the domain name change:
- Broken links: One of the most common issues after changing the domain name is broken links. This can happen when internal links, images, or other elements are not updated to reflect the new domain name. To fix this issue, you can use the “Better Search Replace” plugin to replace all instances of the old domain name with the new domain name. Additionally, check the redirects to ensure that they are working properly.
- Missing images: Another common issue after changing the domain name is missing images. This can happen when images are not updated to reflect the new domain name. To fix this issue, you can use the “Better Search Replace” plugin to replace all instances of the old domain name with the new domain name. Additionally, check that all images are properly uploaded and linked to the new domain name.
- Search engine rankings drop: A drop in search engine rankings can occur after changing the domain name. This can happen when the redirects are not set up properly or when the new domain name is not properly indexed by search engines. To fix this issue, make sure that the redirects are set up properly, and submit your new domain name to search engines for re-indexing.
- 404 Error pages: If the redirects are not set up properly, visitors may encounter 404 error pages when trying to visit your old domain name. To fix this issue, ensure that the redirects are set up properly and that they are directing visitors to the correct pages on your new domain name.
Updating Google Analytics and Search Console for the New Domain Name
Updating your website’s domain name in Google Analytics, Search Console, and Social Media is an important step in the process of tracking the website’s performance on the new domain name. Here is a guide on how to update your website’s domain name in Google Analytics, Search Console, and Social Media:
1. Updating Google Analytics:
- Sign in to your Google Analytics account.
- Go to the Admin section, select the property, and view what you want to update.
- Under the “Property” column, click on “Property Settings”.
- Update the “Default URL” to your new domain name.
- Save the changes.
2. Updating Search Console:
- Sign in to your Search Console account.
- Select the property you want to update.
- Click on the three dots icon on the top right corner of the page, and then select “Change of Address”.
- Enter the old and new website addresses and verify the ownership of the new website.
- Click on the “Submit” button.
3. Updating Social Media:
- Update your website’s URL on all of your social media profiles and bios.
- Update any links in your social media posts to point to your new domain name.
- Make a post on your social media platforms to notify your followers of the change of domain name and new website address.
What To Expect When Changing Your WordPress Domain Name
When changing a domain name on a WordPress website, there are a few things that you should expect:
- Downtime: Changing the domain name can cause a brief period of downtime for the website.
- Broken links: Some links within the website may be broken after the change and will need to be fixed.
- SEO impact: There may be an impact on the website’s SEO, as search engines will need to re-index the website with the new domain name.
- Email and other services: Email services and other services associated with the old domain name may be disrupted temporarily, and will need to be reconfigured to work with the new domain name.
- Monitoring: The website should be monitored for a few days after the change to ensure that everything is working properly.
- Backups: Before making any changes, it’s important to take a full backup of your website to ensure that you have a copy of your website’s content, settings, and files in case something goes wrong during the process.
How To Reduce the Risk of SEO Impact When Changing Your WordPress Domain Name
Here are a few steps that you can take to reduce the risk of SEO impact when changing the domain name on a WordPress website:
- Redirects: Set up 301 redirects from the old domain name to the new domain name for all pages. This will help to ensure that visitors and search engines are directed to the correct pages on the new domain name.
- Update internal links: Update all internal links within the website to point to the new domain name. This will ensure that search engines can easily find and index all of the pages on the new domain name.
- Update external links: Reach out to other websites that link to your website and ask them to update the links to the new domain name. This will help to ensure that search engines can find and index all of the pages on the new domain name.
- Update Sitemap: Update your website’s sitemap to reflect the new domain name and submit it to Google Search Console.
- Update Google Analytics: Update the website’s domain name in Google Analytics, so that you can track the website’s performance on the new domain name.
- Monitor the website: Monitor the website for a few days after the change to ensure that everything is working properly and check for any issues with the redirects, links, or any other problem.
- Wait for the search engines to re-index the site: Give some time for the search engines to re-index the site with the new domain name, this process may take some time and it may affect the website’s search engine rankings temporarily.
- Keep the old site live: Keep the old website live and redirect to the new domain name for at least a few months after the change to ensure that any links or bookmarks to the old domain name will still work.
- Monitor Search Engine Rankings: Keep an eye on your website’s search engine rankings and track any changes to ensure that the website’s SEO is not significantly impacted by the domain name change.
- Use a Domain Name System (DNS) provider that supports the use of Canonical Name (CNAME) Flattening, which makes the website’s DNS records more resilient to changes in IP addresses.
Conclusion
Changing the domain name on a WordPress website can be a complex process, but by following the steps outlined in this guide, you can minimize the risk of SEO impact and ensure that your website continues to perform well after the change.
From backing up your website, updating your DNS settings, redirecting links, and updating all the settings related to the website, this guide has covered all the important aspects of the process.
It’s important to remember that changing your domain name is a big step and it’s important to take your time and get it right.
By following the tips and best practices outlined in this guide, you can ensure that your website will continue to be successful after the change.
And, if you need any help, don’t hesitate to reach out for assistance from a developer or hosting provider. With their help, you can navigate the process with confidence and ensure that your website is in good hands.
Resource for Your Help
Here is a list of resources that you may need in process of changing your domain name on WordPress:
- WordPress Codex: The official WordPress Codex provides detailed documentation and instructions for changing the domain name on a WordPress website.
- Better Search Replace: A popular WordPress plugin that can be used to replace all instances of the old domain name with the new domain name in the website’s database.
- Yoast SEO: A popular SEO plugin for WordPress that can be used to update internal links and set up redirects from the old domain name to the new domain name.
- Google Search Console: A tool that can be used to update your website’s sitemap and monitor the website’s performance on the new domain name.
- Google Analytics: A tool that can be used to track the website’s performance on the new domain name.
- W3 Total Cache: A caching plugin that can be used to improve the website’s performance after the domain name change.
- DNS Checker: A tool that can be used to check the DNS settings and ensure that they are correctly configured for the new domain name.
- Redirection: A popular plugin that can be used to set up redirects from the old domain name to the new domain name.
- WordPress.org: An online community where users can ask questions and get help from other WordPress users.
- Online tutorials: There are many online tutorials and videos available that can help readers understand the process of changing the domain name on a WordPress website.